


Vigonovo Hooded Scarf: Free Crochet Pattern
Between two villages in northern Italy stands a small square house. The fence on one side hold up the “Welcome to Ranzano” sign. The fence of the other side of the yard supported the “Welcome to Vigonovo” sign. Our home stood on the middle land between the two towns. On the Vigonovo side, our yard boasted a row of Queen Elizabeth Grandiflora roses - they are now my all time favorite! Those bright pink blooms on strong stems shone vividly against the dull gray fence behind it. Those flowers were rarely cut, but when they were, they lived in my room. To this day, I adore pink roses above all other flowers - and to celebrate the birth of my little girl, I purchased a Queen Elizabeth Grandiflora rose for my own home garden.
This pattern, the Vigonovo Hooded Scarf, is inspired by that row of roses growing against our fence on the Vigonovo side of our property. The gray trellis stitches scarf sets the support for the pink petals that form the edging that frames your face. The base of the scarf is stitches together to form a tube that the petals seem to disappear into, ending in a burst of pink pom pom that imitates a fully opened rose.
Like this? Save it to Pinterest for later?
And while you are there, follow me for more crochet inspiration and free patterns!
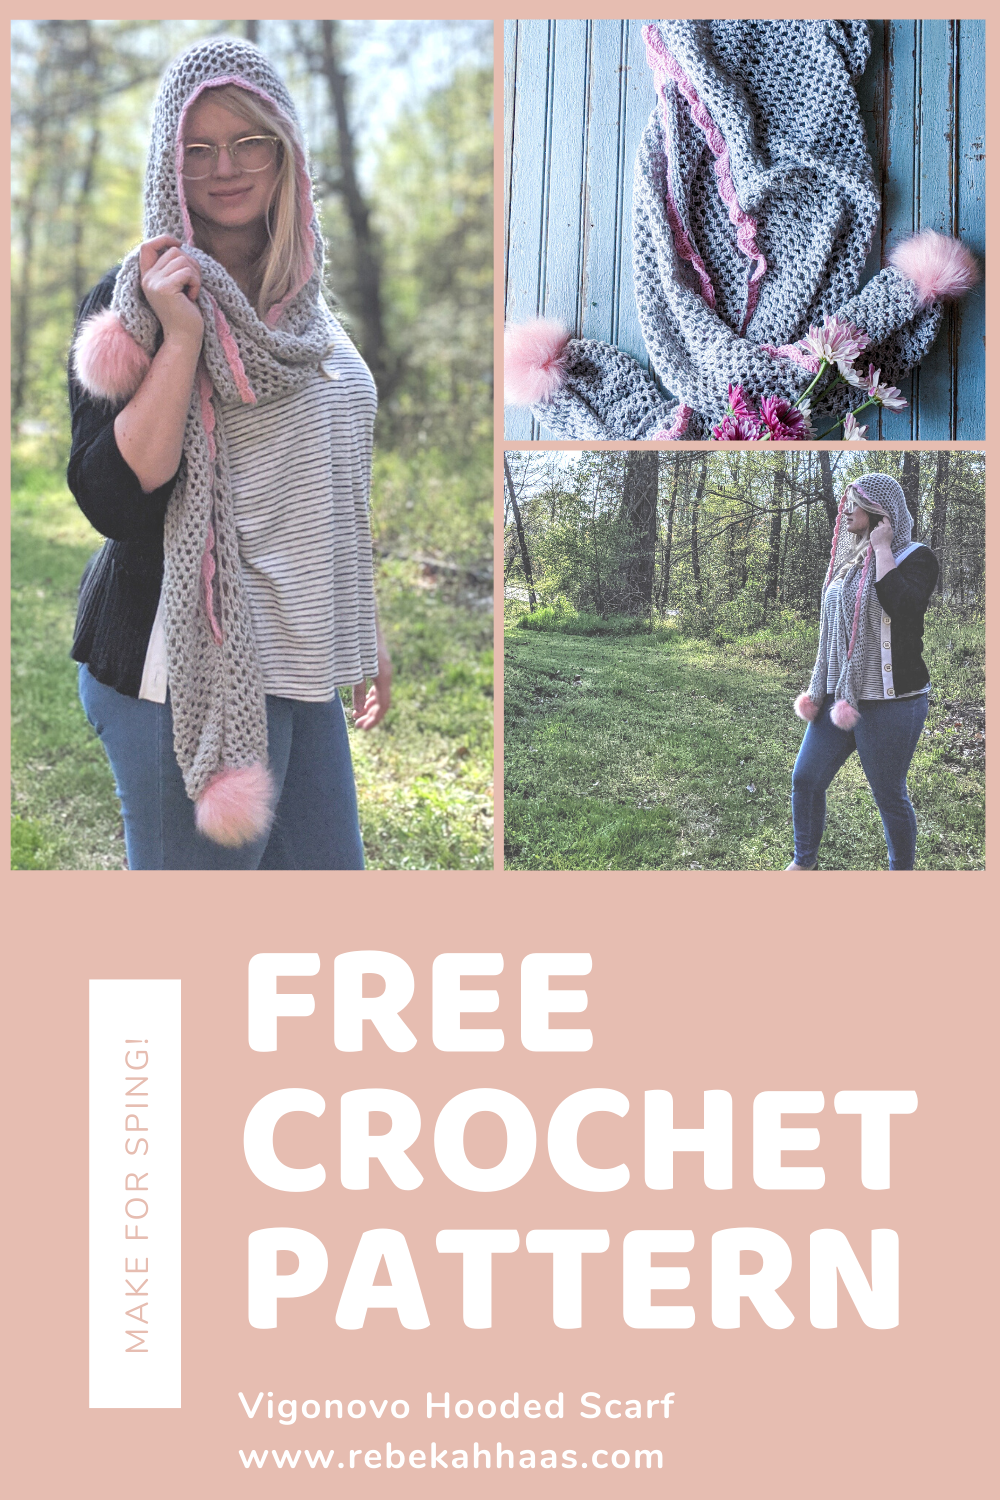
Vigonovo Crochet Hooded Scarf: Free Crochet Pattern #crochetscarf #springcrochet #crochethood
This post contains affiliate links. I receive a small commission from your purchase through these links at no additional cost to you. Please see my Terms of Use for more details.
The Yarn
Opening a new package of yarn is like uncovering a chest of burried treasure, especially if it is the first time I have used that particular yarn. For this crochet pattern, I received some of the softest and bounciest yarns I’ve worked with: the Furls Whims Merino. The Whims Merino is a 50/50 nylon and wool blend that comes in both hanks or skeins. I received three hanks of their light gray in Dk/3 weight and one skein of their pink in Dk/3 weight. Each skein contains 182 yards/166 meters of this ultra sof z-twise yarn. What is z-twist yarn? Well, most yarns are twisted to benefit the motion used when knitting, but the yarn over movement used by crocheters tends to unwind that traditional twist, causing annoying splits and pilling. Z-twist yarn is made with crocheters in mind - that yarn over motion won’t unravel your yarn, so it will be less prone to splitting. While making this project with Furls Whims Merino, I was able to crochet faster than usual, since my yarn didn’t split and slow me down.
The Furls Whims Merino is also a very affordable way to try out more natural fibers. Want to try luxury yarns, but concerned about the price? At $10 for almost 200 yards of DK /3 weight, the price makes it a great contender for taking that first step into Merino wools.

Purchase Your Whims Merino
The Right Tool for the Job
I’ve always been a “get the most affordable tool for the job” sort of girl. But as I get older, as I wear out cheap drill bits, go through shoes too quickly, and make regular trips to the chiropractor for sleeping on a cheap pillow, I’ve learned, “get the right tool for the job.” Until quite recently, I’ve only crocheted with the Boye hooks that came in my original “How to Crochet” set that I bought A LOOOOOONNNGGG time ago. Like, I was in high school. Let’s just say, I’m not in high school anymore. My senior year of college, I was diagnosed with acute tendonitus. After years of crocheting, typing, and playing piano (Yes, I was a music major in college), my wrists had given out. I was put on mandatory rest for a month. I took that month to learn relaxation techniques, to rest when my body demands it, and to get the right keyboard and the right hooks.
The Furls Odyssey is the perfect blend of ergonomic shape and weight for my crochet technique. While no hook is a magical solution to every crocheter’s needs, I feel like Furls comes pretty close! After finishing this project, I switched back to my regular ergonomic hooks for other projects. I immedietly felt my pace slow down and my wrists demand more frequent breaks. I seriously need these hooks in every size!

Purchase your Furls Odyssy
The Pattern
Materials:
540 yds Dk/3 Weight Yarn Color A
I used Whims Merino in Light Gray
50 yds Dk/3 Weight Yarn Color B
I used Whims Merino in Pink
4.5 mm mm hook
Yarn Needle
Faux Furn Pom Poms x 2
Two Buttons
Needle and Thread

Stitches and Terms:
Ch—Chain
Dc– Double Crochet
Sc—Single Crochet
Sl St—Slip Stitch
Gauge:
7 sc, ch 3 x 12 rows = 4”
Notes:
U.S. Terms
Stitches between *stars* are repeated. Stitches in (parenthesis) are made in the same stitch or space.
Starting chain does not count in this pattern.
This pattern can be made to any length simply by continuing to repeat until you reach the desired length.
The pattern is written in rows. Please turn at the end of each row.
Finished dimensions: 13” x 70” (The oversized look will require more length for an adult).

Purchase the PDF on Ravelry for $3
In Color A
Fsc 57, OR ch 58, turn, sc in second ch from hook and each ch. (57 sc)
Row 1: Ch 1, sc in first sc, *ch 3, sk 2, sc in next sc,* repeat to end. (19 sc)
Row 2: Ch 1, sc in first sc, ch 2, sc in first ch 3 sp, *ch 3, sc in next ch 3 sp,* repeat to end, ch 2, sc in last sc. (20 sc)
Row 3: Ch 1, sc in first sc, *ch 3, sk ch 2 space, sc in next ch 3 sp, *repeat to end, ch 3, sk ch 2 space, sc in last sc. (19 sc)
Row 4-114: Repeat rows 2-3. Mark Row 57.
You can repeat rows 1-2 as many times as you like to make the scarf longer. Note, if you make the scarf longer, you will not need to mark row 57, but mark the row that is the center of the entire length of the scarf.
The Hood:
In Color A
Fold the scarf in half and mark the center point of the side you did NOT work row 15 on (Note: If you made 114 rows, you marked row 57, that is the center).
Measure 12” (36 rows) from the fold and place a stitch marker between both sides, holding them together.
Pull up a loop at the fold, sc in the side of each row to the second marker. Make sure to stitch through both pieces, so you create a hood.
Fasten off. Weave in ends.
The Edging:
In Color B
Pull up a loop in the last sc of Row 115.
Row 1: Sc in first 21 sc, *ch 3, sk 3, sc in next st,* repeat 17 more times, sc in last 21 st.
Row 2: Ch 1, sc in first 21 st, *dc 7 in next ch 3 sp, sc in next sc* repeat 17 more times, sc in last 21 st.
Fasten off. Weave in ends.
Seaming the Scarf:
In Color A
Side Seams:
Starting at the bottom of scarf, fold the right sides together and sl st through to hold both Color A sides together, leaving the pink to be folded into the seam when it is turned right side out. Repeat on the other side.

Bottom Seams:
Using the yarn needle, use a running stitch to seam up the openings at the bottom of the scarf.
Stitch an x across the bottom to hold it securely closed.

Adding the Pom Pom:
Using the needle and thread, sew a button to the inside of the bottom seam.
Fold the bottom seams right side out.
Loop the elastic from the pom pom through the bottom seam and loop it over the button.
Note: Most faux fur pom poms cannot be washed or dried. By using the button method to attach them, you can remove them before washing and easily return them to the scarf.
Please make sure to follow the washing instructions for the yarn you used.

Vigonovo Hooded Scarf Crochet pattern
You did it! You made the Vigonovo Hooded Scarf! As soon as my daughter laid eyes on this beauty, she immediately claimed it as her own! It looks so dramatic and whimsical on her - and I’m so happy she loves it.
This pattern is written by Rebekah Haas. I hold the copyright to this pattern. It should not be published, shared, or sold without direct permission of the designer. You are, of course, welcome to sell any items you make using this pattern. If you post pictures of your item on Instagram or Facebook, please credit me with the design by linking to my Instagram account or website. Thank you for choosing to make my pattern! I hope it inspires you!


