


Moss Stitch Hexagon Cardigan - A Made-to-Measure Free Crochet Pattern
Crocheted granny hexagon cardigans and sweaters have been all the rage on social media since last fall. In fact, I made three of them! I found the pattern relaxing, easy, and a fun way to keep my hands busy. However, I found the gaping stitches left me a little too chilly on cold days, but the weight of the fabric was too warm for sunny days. Since the hexagon shape is pretty easy to make, I decided to use one of my favorite lazy-crocheter stitches: the moss stitch!

I’ve made several patterns with the moss stitch (also called the linen stitch) over the years. This simple single crochet - chain one stitch works up quickly, uses a little less yarn, and creates a breathable, but full coverage fabric.

Moss Stitch Cocoon
Want to try the easiest moss stitch cardigan pattern? This cocoon cardigan is made from a single panel!

Moss Stitch Kimono
Made from three moss stitch panels, this kimono pattern adds a feminine lace flare to an otherwise simple garment.
Materials
For this moss stitch hexagon cardigan, I used 100% cotton yarn from Hobby Lobby. The Sugarwheel Cotton combined nicely with their I Love This Cotton yarns to create a fun ombre effect. The yarn is dk/3 weight. If you want the same look and drape as the one pictured, I recommend using a similar cotton or viscose/bamboo/rayon fiber yarn. I realize that I Love This Cotton is a medium/4 weight yarn, but its quite light has has a similar WPI (wraps per inch) as the Sugarwheel Cotton, so mixing the weights did not affect the sizing or tension for this project.
However, since this is a made to measure pattern, you can use any yarn you have on hand. You can easily make this with worsted weight acrylic yarn. Please keep in mind that if you use a larger yarn weight, you will also need a larger crochet hook.
I used a 5.5mm crochet hook to make my moss stitch hexagon cardigan. I wanted the stitches to feel light and airy, not tight and inflexible. If you use worsted/4 weight yarn, I recommend using a 6.5mm hook.
To finish the sleeves, I switched to a smaller hook, 4.5 mm, to make the cuffs. This keeps the stitches nice and tight, so the cuffs don’t stretch out as much over time. It also reduces the number of decreasing rows we would otherwise need to make when forming the cinched cuff.

If you like what you’ve seen so far, please consider supporting our website by purchasing a sticker in our sticker shop and/or subscribing to our newsletter. Each of our stickers is designed by my sister or my sister-in-law, both of whom are incredible artists. We do not offer any AI generated art work.

Stickers!
Artist designed, crocheter approved!
The Pattern (the good stuff!)
Let’s get to crocheting!
Materials:
Yarn: DK/3 Weight Cotton
I used two skeins of SugarWheel Cotton (350 yds each) and four skeins of I Love This Cotton (150 yds each) for a rough total of 1200-1400 yds. I used three complete skeins of the ILTC and most of the fourth, and I didn’t finish either SugarWheel skeins, but used most of it. The amount of yarn you need will vary based on your size.
S: two color changing skeins (if you want the matching color changes) and two solid, or 6 solid skeins (900 yds)
M: two color changing skeins, and three solid, or 7 solid (1050 yds)
L: two color changing skeins and four solid, or 8 solid (1200 yds)
XL: two color changing skeins and five solid, or 9-10 solid (1500 yds)
2xl: three color changing skeins and five solid, or 12 -13 solid (1800 yds)
If you want me to estimate the total for a specific size, you can reach out to me directly through my contact form.
Hook: 5.5 mm, 4.5 mm
Scissors, Yarn Needle, Stitch Markers
Stitches and Terms:
Ch: Chain
Sc: Single Crochet
Sc dec: Single Crochet Decrease
SlSt: Slip Stitch
Fpdc: Front Post Double Crochet
Bpdc: Back Post Double Crochet
Ea: Each
Ch Sp: Chain Space
*If you have any questions about these stitches, please let me know! I try to answer any emails about my patterns as quickly as possible.
Notes:
This pattern is made in joined rounds. Each round is joined with a slip stitch.
This crochet pattern is made to measure. Your gauge will not affect the finished size, since we will just keep crocheting until it is as big as we want.
Since this pattern is made to measure, exact row and stitch counts for specific sizes will not be provided. Simply follow the pattern until you are happy with the overall size and fit.
This pattern can be made with multiple yarn weights. If you use a larger yarn weight, please also go up a hook size. For instance, if you make it with worsted weight yarn, use a 6.5 mm hook.
Pattern:
Ch4, join with a sl st to form a loop.
Round 1: Ch 1, ( sc in the loop, ch 2, ) six times, join with sl st to first sc. You should have 6 sc and 6 ch 2 sp.
Round 2: Sl st to the first ch 2 sp, ch 1, *(sc, ch 2, sc) in the ch 2 sp, ch 1, sk sc, * repeat to the end, join with sl st to first sc.
Round 3: Sl St to the first ch sp, ch 1 * (sc, ch 2, sc) in the ch 2 sp, ch 1, sc in ch 1 sp, ch 1, * repeat to the end, join with sl st to first sc.
Round 4: Sl St to the first ch sp, ch 1, ** (sc, ch 2, sc) in the ch 2 sp, * ch 1, sk sc, sc in ch 1 sp, ch 1* repeat to next ch2sp, repeat from ** to end, join with sl st to first sc.
Repeat Round 4 until you are ready to begin shaping.


*Note: Crochet the hexagon shape until the center to edge measurement matches your armhole depth. Either measure the shoulder to armpit of a favorite sweater or use the following estimated measurements by size:
Small: 7”
Medium: 7.5”
Large: 8”
XLarge: 8.5”
2XLarge: 9”
3-4X: 9.5”
5X: 10”
Please remember, these are estimates based on a wide array of people that wear these sizes. Every body is uniquely shaped, so if you don’t like the fit of the estimate, please feel free to increase or decrease the number of rows to suit you.
I wear a size Large. The garment pictured in this blog post uses an 8” armhole depth.
Shaping
All hexagon cardigans are shaped using the same method. First, determine which side of your hexagon determines which aspect of your cardigan. See the following charts for hexagon shaping and the full explanation below:
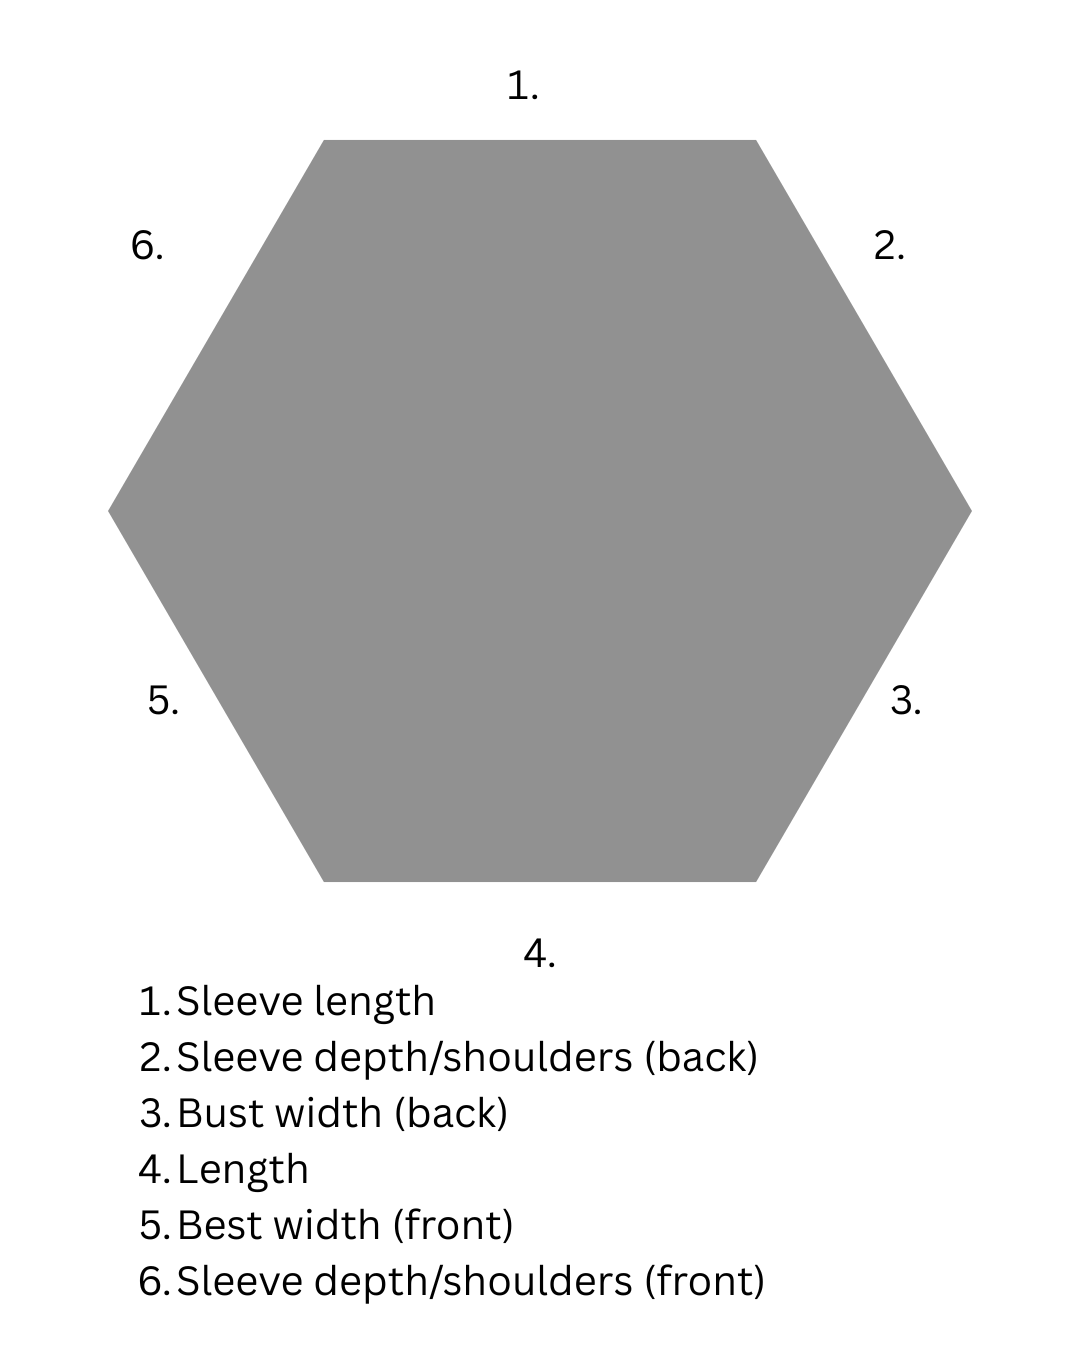

Side 1: The finished edge of side 1 forms the sleeve cuff. Adding rows to side 1 lengthens the sleeve.
Sides 2 and 6: The edges of sides 2 and 6 will be seamed together to form the shoulders of the garment. Adding rows to sides 2 and 6 will increase the width of the sleeve and armhole depth. If you like a full sleeve, continue adding rows to these sides. If you prefer a more narrow sleeve, stop adding rows once you have achieved the armhole depth you need.
Sides 3 and 5: The edges of sides 3 and 5 will be joined to sides 3 and 5 of the second panel to form the sweater, making the center front and center back seam. Adding rows to sides 3 and 5 increases the overall width of the garment. When folded flat (in the second example above), the measurement from the center of the hexagon to sides 3 and 5 should equal 1/4 of your overall bust measurement. For a fitted look, use the exact measurement or go down 1”, for an oversized look, add 1-2” to the garment measurement (for a total of 4-8” oversized).
Side 4: The finished edge of side 4 forms the hem of the sweater. Adding rows to side 4 lengthens the garment.
See below for my finished panel. You can see that two sides are shorter than the other four sides. After I seamed the cardigan, I decided to add more length to the sleeves.

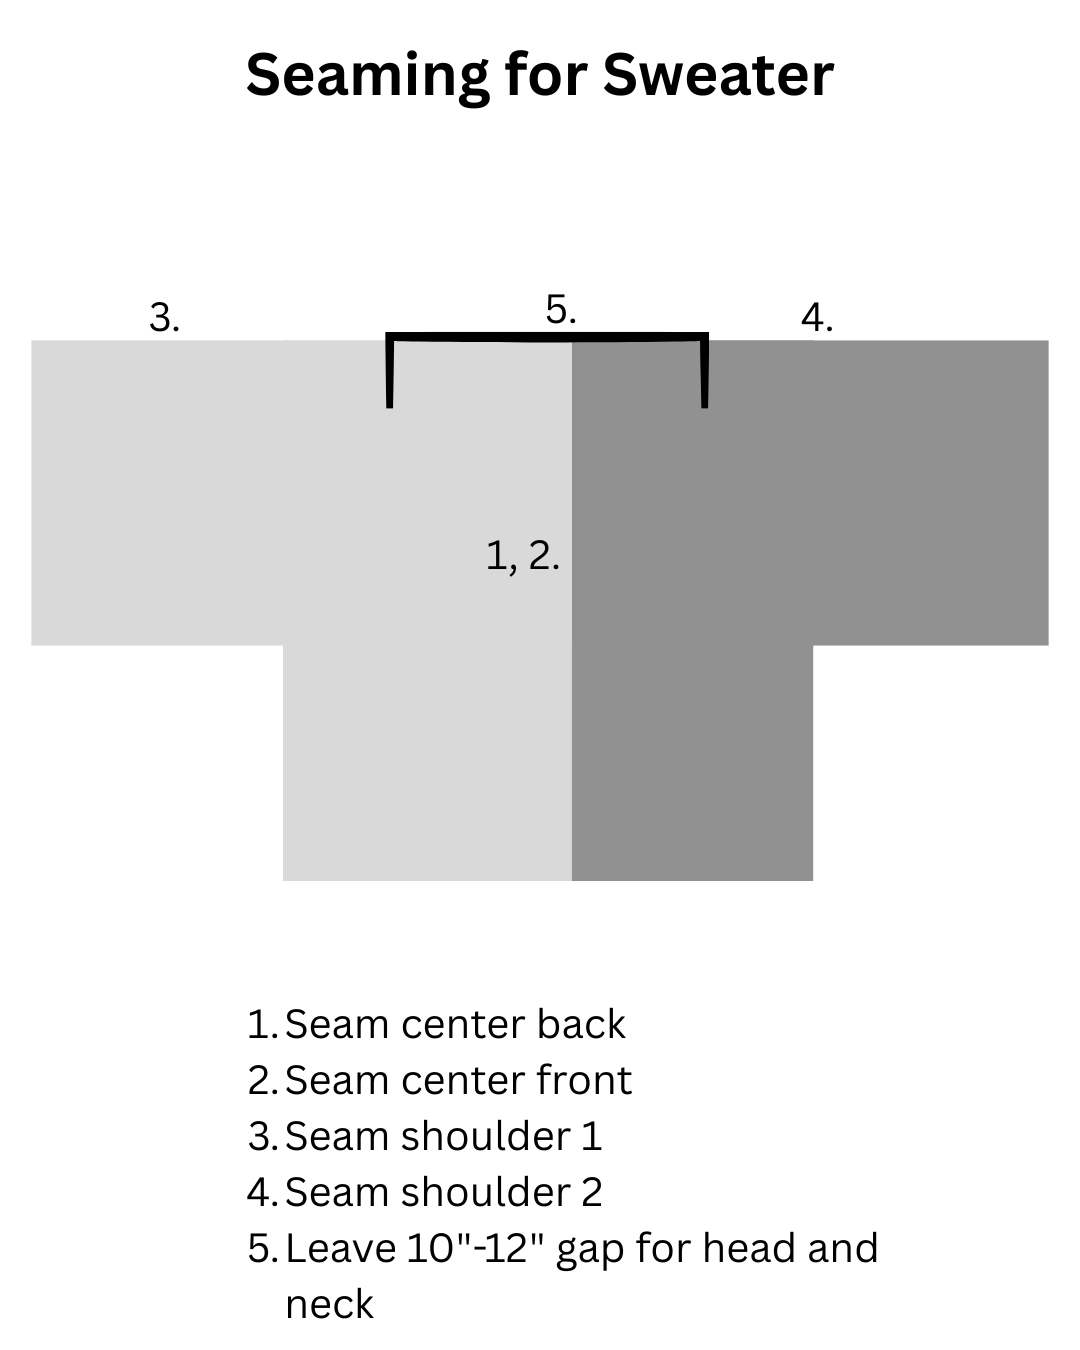
Seaming
Once the two hexagons are shaped as you want, simply seam them together to create a unique cardigan or sweater.
The order of the seams changes depending on whether you want to make a sweater or a cardigan. A cardigan has an open front, so seam the two shoulders first, then seam the back.
If you are making a sweater, closed in the front and back, seam the front and back together first, then do the shoulders, leaving room for your head. You will need to leave a 10”-12” gap for the neckline.

Sleeve Cuffs and Ribbing
If you prefer the loose sleeves, you don’t need to add the cuff, but I prefer to cinch up the sleeves.
Using smaller hook (4.5 mm), pick up a loop along the bottom of the sleeve, ch 1.
Round 1: Sc dec across two stitches around, join with sl st to first sc. The total stitch count will depend on how many stitches you have in your sleeves. Try on the cuff before moving on. If you like the fit, move to Round 3. If it is too big, move to Round 2. Round 3 works best if you have an even number of stitches in this round.
Round 2: Ch 1,* sc in the next three stitches, sc dec* repeat around, join with sl st to first st. The exact repeat might not fit, depending on how many stitches you ended Round 1 with. Don’t worry about it. Doesn’t matter. Try on the cuff. If it is too big, undo this Round 2 and reduce the number of sc between the sc dec. If the cuff is too small, undo the round and increase the number of sc between the sc dec. The next round works best if you have an even number of stitches in this round.
Round 3: Ch 1, fpdc around first st, *bpdc around next st, fpdc around next st, * repeat around, bpdc around last st, join with sl st to first st.
Round 4-5: Repeat Round 3. Fasten off, weave in ends.

Finishing Touches
For my cardigan, I decided to add a simple edging around the opening. You can choose to add a ribbing to match the cuff or keep the edging very simple.
Using larger hook (5.5 mm), pick up a loop in the back of the neck.
Round 1: Ch 1, sc in each stitch around, working 3 sc in each ch 2 corner space (you should have two ch 2 corner spaces), join with sl st to first sc.
If you want to add ribbing, follow the instructions for Rounds 3-5 from the sleeve cuff.
Round 2: This row is worked backwards. If you are right handed, you will work the stitches from left to right. If you are left handed, you will work the stitches from right to left. Ch 1, rsc in previous stitch, *skip st, rsc in next st, * repeat around. Join with sl st to first rsc. Note: if working rsc in every other stitch is pulling in your work, adjust to working rsc in every stitch. Personally, I find my edge gets wavy if I use rsc in every stitch.
Fasten off, weave in ends.
For a sweater, follow these instructions:
Using larger hook (5.5mm), pick up a loop in the back of the neck.
Round 1: Ch 1, sc in each st around, join with sl st to first sc.
If you want ribbing, follow instructions for Rounds 3-5 of the sleeve cuff.
Round 2: This row is worked backwards. If you are right handed, you will work the stitches from left to right. If you are left handed, you will work the stitches from right to left. Ch 1, rsc in previous stitch, *skip st, rsc in next st, * repeat around. Join with sl st to first rsc. Note: if working rsc in every other stitch is pulling in your work, adjust to working rsc in every stitch. Personally, I find my edge gets wavy if I use rsc in every stitch.
Fasten off, weave in ends.


Thank you!
Thanks so much for using this pattern and reading to the end! Please remember that all the photos and written words of this blog post are the intellectual property of Rebekah Haas. Please do not distribute copies of my work without permission.


