


DIY Mandala Earrings - Full Tutorial
Is crocheted jewelry cool again? I’m seeing crocheted garments and jewelry in fashion shows and in Youtuber’s “What to Wear” videos, and I wonder - am I finally cool??? I’m not sure, but either way, I am loving the crochet trends I am seeing all over Pinterest and the rest of the cyber world! I’m ready to put some into my own wardrobe, so I whipped up a pair of delicate lace earrings. These beauties are a miniature version of Bucaneve: The Beginner’s Mandala only made with #10 weight thread.
Oh, you haven’t worked with thread before? Check out my super detailed post for some tips and tricks as well as hook recommendations!
Pin this post to your favorite Pinterest board to save it for later!
And don’t forget to follow me on Pinterest for more fun crochet patterns and tutorials!
Crochet Mandala Earrings: create your own diy fashion statement with this full photo tutorial
This post contains affiliate links. I receive a small commission when you purchase from these links at no additional cost to you. Find all the boring details in my Terms of Use.
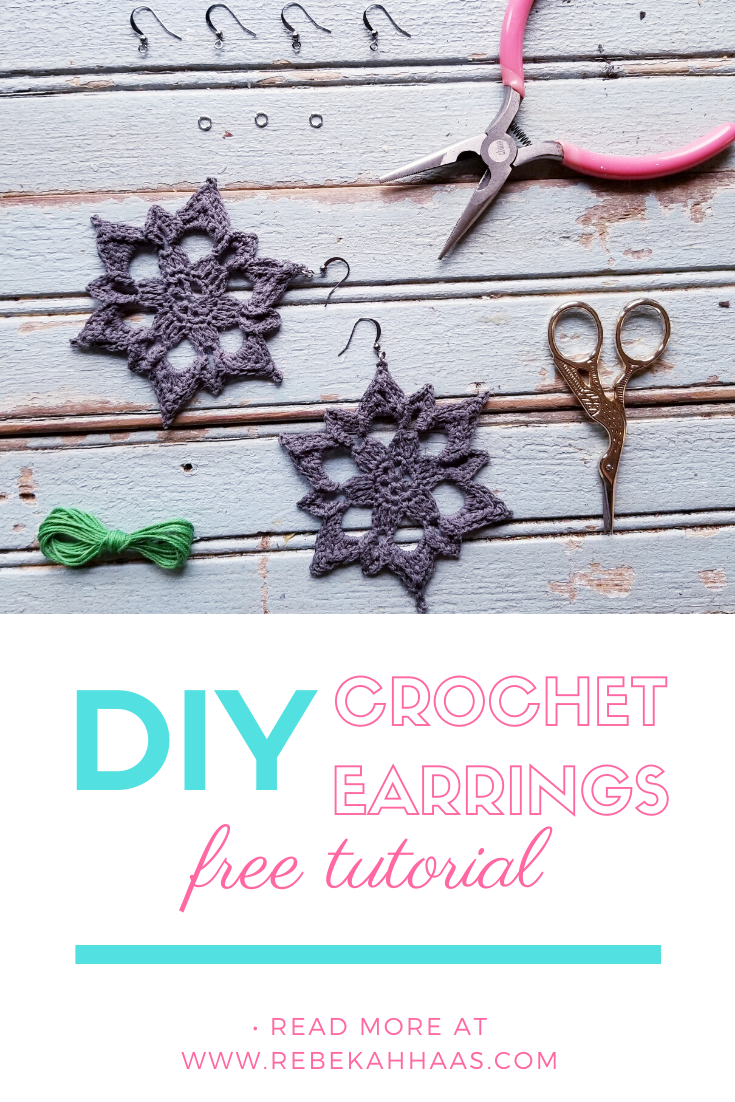
Materials:

1.25 mm Crochet Hooks (Learn more about thread hooks here)


1. Create the mandalas!
Using the #10 cotton thread and 1.25 mm hook, make two Bucaneve Mandalas. These will be the decorative portion of the earrings.

Bucaneve Mandala
2. Hard block the mandalas
After completing the two Bucaneve Mandalas, soak them in fabric stiffener and pin them into position.

Materials to block crochet lace
I first soaked the mini crochet mandalas in water, then worked the fabric stiffener through the fibers. I found that, after they had dried, they were not quite as stiff as I wanted. To achieve a really stiff appearance, I brushed more fabric stiffener onto each mandala, using one of my kid’s craft brushes. Of course, if I had been more thorough with the fabric stiffener in the beginning, I wouldn’t have needed to brush it on.

Crochet mandalas pinned to block.
If you don’t have a blocking board, you can simply lay wax or parchment paper over your ironing board and pin the crocheted mandalas onto it.
Leave them to completely dry - roughly 24 hours.
3. Assemble the earrings
The process to assemble the earrings is similar to the process we used to make our unique stitch markers.
I opened the jump ring and threaded it through one of the picot stitches. The blocking and stiffening process had closed up the picot stitch, so I used a straight pin to open it back up.
After threading the jump ring through the picot, I added the fish hook earring to the jump ring as well before closing it up using my needle nose pliers.
IF YOU LIKE IT, PIN IT!!

DIY Crochet Mandala Earrings: a full photo tutorial to create your own stunning fashion accesssory.
As a lover of the unique and vintage, these earrings hit me in just the right place! They are delicate, but still bold and slightly oversized. They make a statement, while still being subtle enough to accent any outfit.
Of course, if you find them a little too big for your personal style, you can always make them with either embroidery thread or #30 weight thread - this will give you a smaller earring, but still give you that farmhouse vintage style!
If you like all things farmhouse AND tutorials, check out these farmhouse rosettes!
I love seeing other’s interpretations of my patterns! If you make one, please share it on Instagram and tag me! Please remember that the pattern and images for this tutorial belong to Rebekah Haas - me. You are more than welcome to sell items you make using this pattern, but please do not use my images to advertise your items. Please do not copy this pattern in whole or in part to share with others - simply refer them to this page.


